Never Pay For Copies
The Complete Dummies Guide to Stocking Your Literature Table
“See, in my line of work you got to keep repeating things over and over and over again for the truth to sink in, to kind of catapult the propaganda.”
— George W. Bush
How To Select Effective Literature
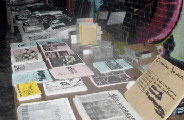
The absolute most important part of a literature table is, of course, what’s on it. The effectiveness of the style and voice of the literature you choose to distribute depends on the atmosphere you present it in. The literature available at an event should appear to complement it seamlessly and push it to the next logical step—e.g., an introduction to street art at a gallery opening or a collection of DIY guides at an alternative music club—be relevant, and up-to-date. Don’t waste people’s time with barely readable 8th generation photocopies; if the content is essential, take an afternoon to renovate it with some fresh images and illustrations and correct margins. Speaking of waste, don’t waste paper either: informative literature is like poetry, say as much as you can with as little words as possible.
In that same fashion, 2 or 3 amazing pamphlets with copies available for everyone interested is a far more valuable approach than 25 different titles with only a handful of each. Don’t bore people with obscure philosophy—unless you’re tabling in the lobby of a philosophy lecture, in that case make the literature unbearably obscure and esoteric. In review: literature should be relevant to the event, contain up-to-date information and contact information, be easy to read (and reproduce!), short, sweet, readily available for everyone and satisfying to read. If you can’t say all of those things about the zine you’re thinking about distributing, retire it to your zine library or rewrite it.
“Freedom of the press is limited to those who own one.”
— A. J. Liebling, a journalist who had the misfortune of death before KINKOS.
Freeproducing Your Literature
Pardon the wordplay, but it’s true—there is no reason to pay for photocopies. If you look hard enough—and you better!—you will find an unattended photocopier or laser printer. Check out a local university—sometimes you can find a public printing kiosk, but if you can’t track down a student ID to access lab computers. You can plug laptops directly into network printers and bypass security. Corporate copy-centers usually provide convenient “one of us in every town” access, but you’ll have to find the right way to ask. Regardless of the method, you’ll find a way, and when you do, proceed to the next step.
GLOSSARY
Firstly, it would help to become familiar with a few terms.
-
PDF—or, portable document format—is a file format developed by Adobe Systems that renders documents to appear uniformly on any computer system. If you have digital media to print, this is the format it should be in. Chances are an available scanner can output a PDF directly, otherwise Adobe InDesign is the recommended program for laying out PDFs from scratch. There are other ways to create a PDF file including using a Mac to print a document. [ File > Print > PDF > Save As PDF ]
-
IMPOSE—This is the process of arranging pages onto spreads so that they will read in the correct order after printing and folding. If a digital file is described as “Print Ready” or “Imposed”, you can assume that it has already gone through this process. For some, this process can be a headache to manage on most software; if you are one of these people, you might find doing it manually with individually printed pages to be easier.
-
DUPLEXING—In simple terms, this means to print on both sides of a piece of paper, something you’ll find decent laser printers and almost all photocopiers can do. Never settle for hand-fed double-sided copies, unless you are backed into a corner.
-
SADDLE-STITCH—Is a book-binding technique where the binder folds the pages in half and staples them together on the center fold. You will find this is the most effective way to keep your literature from falling apart.
Out Of The Frying Pan…
Now that we’re speaking the same language, let’s figure out how you’ll get these things onto paper and into your backpack. For your own sake, you’ll want to avoid inkjet printers at all costs—in addition to being terribly old-fashioned and unreasonable, they often leave hideous misprinted streaks in the finished product. On laser printers, you’ll find the duplexing option somewhere in the Print dialogue, likely in the layout tab. On photocopiers you’ll probably find a one-sided to two-sided option, you can use this to scan in individual pages to make an imposed master copy. The two-sided to two-sided copy option is what you’ll use if you already have a master flat of the zine you’re trying to reproduce, this instructs the machine to feed your zine through and make copies of both sides of each page. You’ll probably find the tray at the top of the copy machine, where you’ll simply drop the stack of flats into and select the amount of copies you’d like to make and let the machine do the rest!
Into The Fire…
Now you have a stack of hundreds of leafs of paper. Hopefully, you’ve kept them in some discernible order. When you’re assembling them, you might find your hands get exhausted by folding zine after zine, this is you’re body telling you what any seasoned zine binder knows already—your hands won’t do the trick! In order to get a crisp fold without damaging the paper, use a mason jar or butter knife or something else with a solid and smooth edge—Bone Folders are preferred by most binders and work amazingly! Get your hands on a long-armed stapler, if you like to pay for things like that, you prepare for as much as $30, otherwise they are widely available for free at the nearest corporate office supply. You’ll find your way through this process sooner or later and develop a solid rhythm. Once you’re done assembling all of your zines, wrap them up with rubber bands so they stay together and remain easily identifiable.
DOWNLOADS AVAILABLE
-
Browse our own selection for print-ready downloads. Including our new re-edition of an out-of-print Inside Front account: The White Shark Tales chronicles the adventures of several CrimethInc. operatives throughout their harrowing endeavors. Revisit demonstrations in DC, a Reclaim The Streets in North Carolina, an Earth First! Rendezvous, a mutual aid assignment to the mountains of southern Mexico, and much more.
-
Prole.Info has just released an informative coloring book decrying the restaurant industry, and made it available for download. If you can navigate through the site you’ll find more interesting and provocative PDFs.